


Garlic Fried Egg Tacos
Homemade corn tortillas, pickled onions and a seasonal salad make for perfect spring dinner
It’s Tuesday, it’s dinner time, what do you turn to? Tacos, duh. Taco Tuesday is a quintessential American food trend originally devised by the Tex-Mex food chain, “Taco John’s” as a marketing strategy back in the early 1980’s. The company even trademarked the alliterative phrase in 1989, though it hasn’t stopped the event from gaining worldwide popularity. The Wyoming-based chain is known for sending out cease and desist letters to any restaurant who advertises a “Taco Tuesday” special — which is why you’ll often see, for example, “$2 Tacos on Tuesday” rather than using the trademarked phrase. Interesting, huh?
To what might be a slightly contentious opinion, I am here to argue that the Mexican food in Davis is lacking authenticity or any out-of-the-box culinary attempts. While I acknowledge the regular Taco Tuesday goers — and I get it, cheap tacos, margs and friends — I believe if you want truly good tacos, you have to either travel outside of Davis or take initiative in your own kitchen.
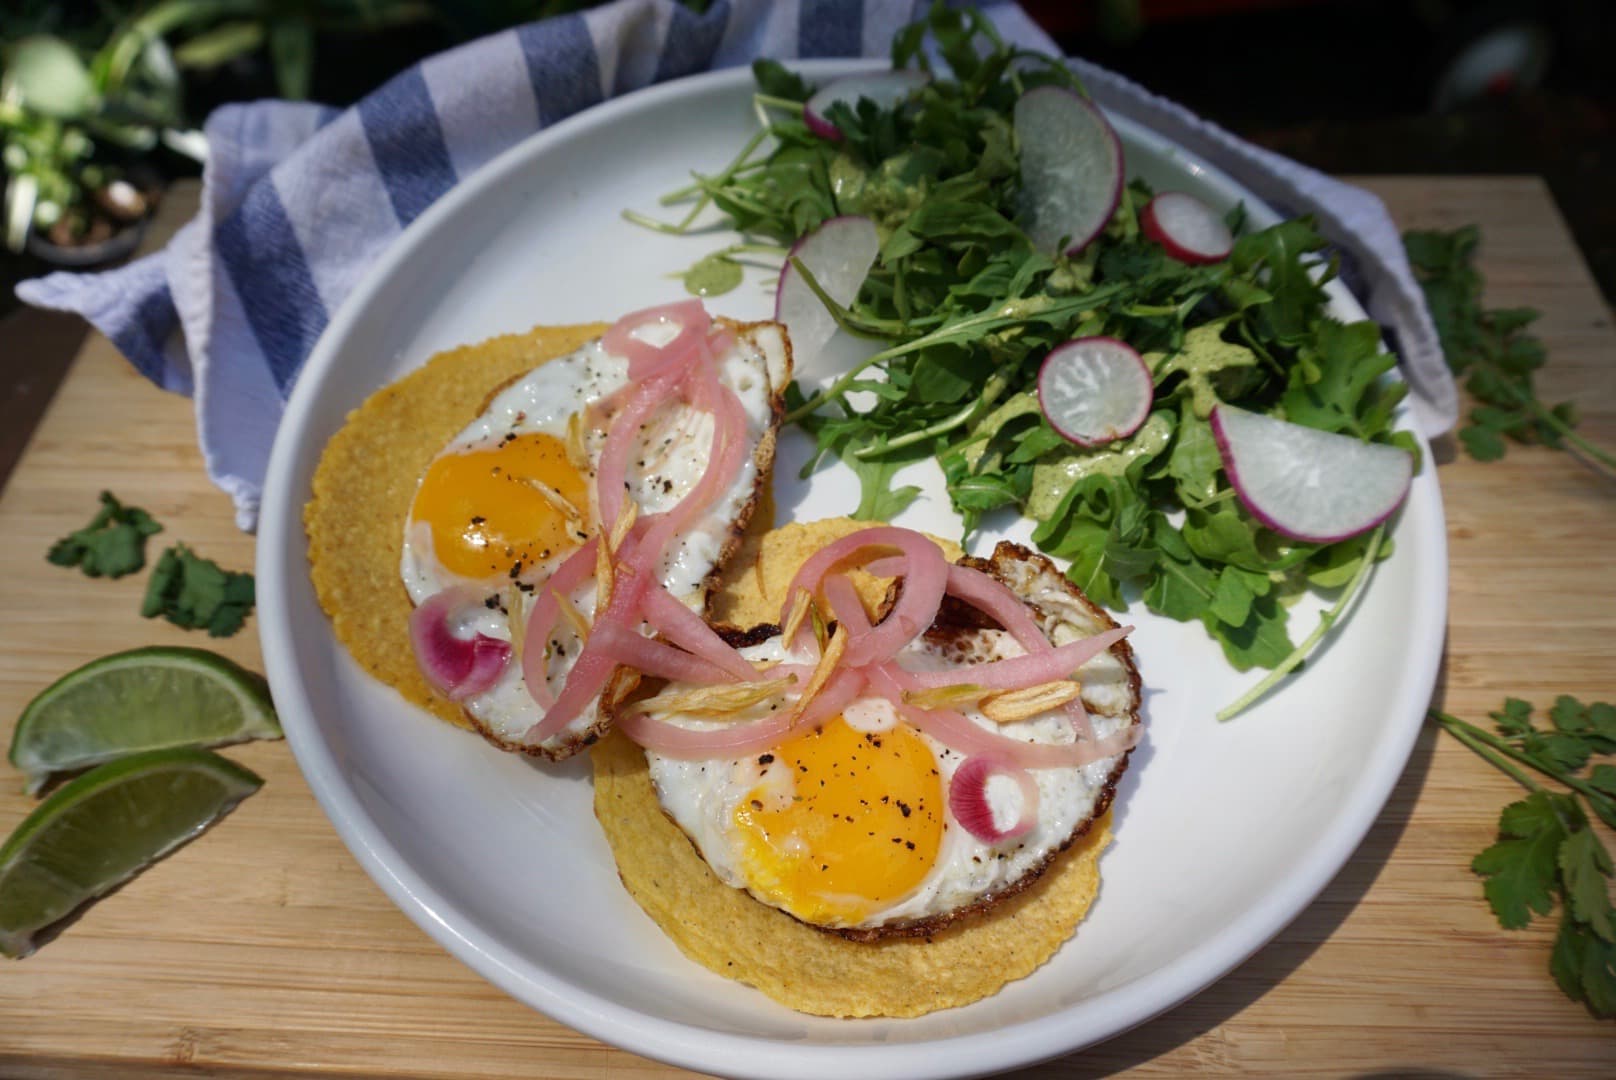
I opt for homemade…specifically, garlic fried egg tacos topped with pickled red onions in a homemade corn tortilla with a side salad of seasonal arugula and a creamy cilantro lime dressing — *gasps for breath*.
Different from your average scrambled egg breakfast tacos, the fried egg’s runny yolk serves as a beautiful salsa — salsa as in the direct translation for sauce — but when accompanied by tomato salsa or hot sauce it balances the spice and acidity and gives it body. Eggs are cheap, easy to prepare and can be served for breakfast, lunch or dinner; not to mention they’re a good source of protein and fat. It’s not a traditional or authentic taco, but you can’t get this at any Davis taqueria.
This is a fancier version of the lunch I have been making every day for the past few months, no exaggeration, every single day… it’s delicious, affordable, quick, and I haven’t gotten sick of it yet. This recipe can be as simple as buying premade tortillas, eggs and avocados and whipping these babies up in 5 minutes, or it can be carried out how I am about to detail below, raising the stakes with homemade corn tortillas, introducing some fried garlic oil and pickling some red onion to go on top. And for the side, I take advantage of superior Californian produce with a seasonal salad paired with a homemade cilantro lime dressing.
Disclaimer, I am not a professionally trained chef, nor do I claim to be a taco expert; however, I am an avid home chef as well as a Southern California native — that is, my taste buds have been attuned to distinguish between the Americanized flavors and the real stuff. And I will firmly say that what makes or breaks a taco, is the tortilla — a Mexican restaurant is not authentic unless it makes its own corn tortillas. Once you eat a real, soft, homemade corn tortilla, there is no going back to the chewy and bland processed ones.
To make the tortillas, all you need is a masa harina mix. I used Bob’s Red Mill organic masa harina from the Davis Co-Op, water and salt. While it’s not necessary, a tortilla press is extremely helpful. I did not have a tortilla press when I embarked on this process, but after researching makeshift techniques such as using a rolling pin or a cast iron pan and elbow grease, I forked out the $13 and ordered a tortilla press on Amazon.
Homemade Corn Tortillas:
I start by mixing the dough according to the package instructions — mix 2 cups masa with ½ teaspoon salt in a large bowl, then slowly add and mix in 1½ – 2 cups warm water (I used 1½ cups of water). The consistency should be firm and springy, not crumbly or sticky. I used my hands — because why dirty up a spoon? Plus, it was an extremely satisfying texture and playing with the dough made me swell with nostalgia. After I had my fun, I formed the dough into a ball and covered the bowl with a towel to let sit out for an hour.
Use this hour to begin to prepare the rest of the meal.
Pickled Onions:
Tart, acidic, fresh, crunchy — this deceitfully fancy and seemingly involved topping is actually quite simple to make. I recommend preparing the pickled onions the night before to let them marinate and break down further in the brine; however, since we are using a quick, vinegar-based method of pickling, as little as 30 minutes will do the trick. Basic pickled onion recipes are fairly consistent across the board no matter where you get it from, I got mine from Bon Appétit.
1 red onion
½ cup apple cider vinegar
1 tablespoon sugar
1½ teaspoons of salt
The onion I picked was abnormally large, so I had to make a half-portion of the pickling liquid in addition to the full portion (a.c.v., sugar, salt), keeping the proportions the same. The key is that the liquid covers, or nearly covers, the onion in whichever vessel you chose to store it in, I used a large mason jar.
Peel then slice the whole onion very thinly. I like to keep the onion whole so I get at least some rings, but halving lengthwise — keeping each half intact with the root — works just the same.
Tip: when cutting onions, keep the root intact as you chop to prevent or lessen crying, putting a cup of water next to your cutting board helps too.
Next, add the apple cider vinegar, sugar and salt to a jar, cover and shake until sugar and salt have dissolved. Add the sliced onion and press down to submerge in the liquid.
That’s it! Cover the jar and let sit for at least 30 minutes. These keep up to two weeks in the fridge. Highly impressive, very delicious and painfully simple.
Creamy Cilantro Lime Dressing:
My favorite base for a creamy, thick salad dressing is tahini — ground sesame seeds, think peanut or almond butter consistency. It has a nutty and subtle bitter flavor, and is a great way to replicate creamy dressings sans dairy.
The principle ingredient in this dressing is the fresh, seasonal cilantro — most herbs are harvested in the spring. Start by roughly chopping a small handful of sprigs, about a half cup packed. Add to a blender along with the juice from 1½ limes, ¼ cup tahini, 1 medium clove of garlic, a ½ teaspoon of salt and pepper to taste. You may have to stop to scrape down the sides a couple of times, each time adding a tablespoon of water to help thin the consistency — I ended up adding 3 tablespoons. Blend until cilantro bits are fine, if you have an above average blender, you can get it pretty close to a homogeneous mixture.
Seasonal Salad:
Light, but not light on flavor. Arugula, otherwise known as rocket, is a cute little leaf with a bitter punch that cuts through the heft of the main. Topped with avocado, radishes (in season) and the creamy, herby dressing, this salad does a delicate dance between fresh and crisp, to astringent and tangy.
Thinly slice or mandolin a few radishes and half, score and scoop one avocado and add to a bowl of arugula. Toss with desired amount of creamy cilantro lime dressing.

At this point, your masa should be ready to hit the press. This may be a two-person activity, but if you are a confident and focused multi-tasker, go for it. I opted for some assistance and had a little tortilla date — one on the press, one on the stove.
Begin by cutting a gallon Ziplock bag along its sides so that the bottom is still attached and it is one large rectangular sheet. Orient the tortilla press with the handle on your dominant side — I’m a righty, so handle to the right. Place the bottom seam of the bag in the plate hinge on the left so that each plate is lined with the plastic.
Before pressing, heat a pan or griddle to medium/medium-high heat.
Next, uncover the bowl of masa — the dough should be set and firm — and roll little balls of masa between your hands, slightly smaller than a golf ball. Depending on how thin or thick you like your tortillas, you can adjust the amount of masa or pressure you apply to the press. Place the ball on the plastic lining the bottom plate of the press. Because of the way that the top plate comes down, you want to place the ball off-center to the left because the tortilla will spread closer to the handle. Close the top plate and use the handle to press — put some weight into it. And voilà! Gently peel the tortilla from the plastic and throw on the warm pan or griddle. Cook for around 30 to 60 seconds on each side until they achieve some color. They may puff in the middle, totally normal. Wrap in a kitchen towel to keep warm. Repeat this process until you have used all of the masa — my batch yielded around 15 tortillas.
Now for the star of the show…

Garlic Fried-Eggs & crispy garlic chips:
(1 serving = 2 eggs)
Start by heating a generous amount of olive oil in a nonstick pan on low — not enough to completely cover the bottom, but enough so that if you tilt the pan you could fill a large spoon. It is important to heat your oil slowly, on low as to not burn it because we will use this oil to cook the eggs later on.
Once the oil is warm, about two minutes, add 1 to 2 thinly sliced garlic cloves. I prefer slicing them lengthwise, but circular rounds work just the same. They should sizzle and bubble when they hit the oil, but not brown — if they start to brown immediately, the oil is too hot and the garlic chips will burn. Let the garlic chips fry in the oil for about 2 to 3 minutes, until they are golden brown, fishing them out of the pan with a fork and placing them on a paper towel to let cool.
Eggs:
Keeping the garlic infused oil in the pan, raise the temperature to medium-high to let the oil heat further.
Crack two eggs on opposite sides of the pan, avoiding contact if possible — keeping the saucer shape is more for aesthetic reasons, but avoids having to cut them apart later on. When the eggs hit the pan, they should sputter and crackle. After a minute or so, the white should puff and bubble, and the edges should start to reveal some color.
Tilt the pan so that the oil runs to the edge and spoon the hot oil over the tops of the egg whites, avoiding the yolk. The hot oil will help cook any translucent, uncooked bits. Cook for one more minute.
I like to salt and pepper the eggs just before they are done.
They are done once the edges have crisped, the bottom has browned past golden and the whites on top are cooked. Remove from heat and plate.
Lay the crispy fried egg on the bed of the warm tortilla, top with onions, garlic chips, avo, hot sauce, lime juice, go crazy. Serve with salad and devour.
Ingredients
Salad:
1 Bag of arugula
2-3 Radishes
1 Avocado
Creamy Cilantro Lime Dressing:
½ cup (packed) roughly chopped cilantro
Juice from 1½ limes
¼ cup tahini
3 tablespoons water
1 medium garlic clove
½ teaspoon salt
Pepper to taste
Quick Pickled Onions:
1 red onion
½ cup apple cider vinegar
1 tablespoon sugar
1½ teaspoon salt
Garlic Fried Egg and Garlic Chips:
2 eggs
1-2 cloves of garlic
2 tablespoons olive oil
Salt and pepper to taste
Corn Tortillas:
2 cups masa harina mix
½ teaspoon salt
1½ – 2 cups warm water
Written By: Grace Simmons — arts@theaggie.org